Chapter 2: Suspension Components
2.1 Springs
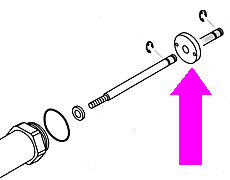
The most common variety of springs are coil springs (see pic), these are usually placed around the damper housing to form a spring-damper unit. A spring is an elastic device that resists movement in its direction of work. The force it exerts is proportional to the movement of one of its ends. Or to put this into a mathematical equation: Force = movement * spring constant. A high value for the spring constant makes for a stiff spring, and a low value makes for a soft spring.

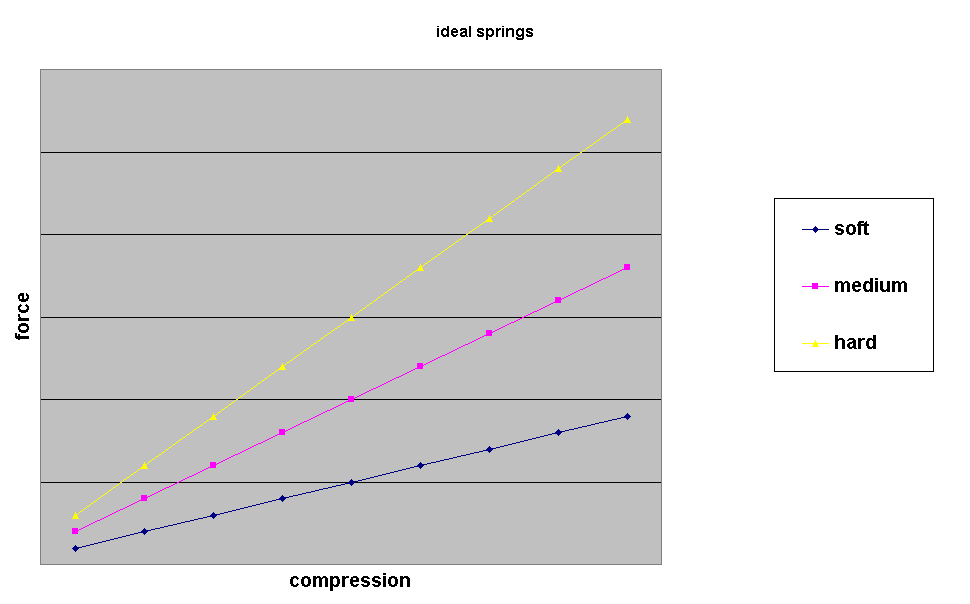
For progressive springs the spring constant will increase as the spring goes deeper into its travel, and for regressive springs it will decrease with travel. Most coil springs are slightly progressive, because as they compress, some of the coils start touching each other, aspecially near the top and the bottom, and hence the number of active coils decreases.
So math wise, springs aren't very complicated, but handling wise, they are. The problem is that they work in two dimensions: left to right and front to rear. For example: a car with soft springs will experience a lot of body roll in fast turns, but it will also dive very hard under heavy breaking and squat a lot while accelerating. This is because the springs have to absorb the torques that are generated (see roll center and anti-squat), and soft springs need to be compressed over a larger distance to be able to absorb a certain force. (If this doesn't make sense, I suggest you take another good look at the graph) Note that both observations have the same effect: more load on the front tires. So you might think: "Why make a big deal out of this, the effect is the same." It's a big deal because by the time you have read all of the chapters, you'll be able to adjust a car's lateral balance independent from its longitudinal balance, but for now, just remember that spring stiffness affect
s just about anything: bump handling, roll stiffness, pitch stiffness,… .
In general, you could say that stiffer springs yield less grip on that end of the car, and conversely, softer springs yield more grip. This is because springs inhibit weight transfer, both front-to-rear and left-to-right: for the same cornering, acceleration or braking force a stiffer spring will compress less, resulting in less chassis movement and thus also less weight transfer, and a soft spring will compress a lot, resulting in a lot of weight transfer.
But, you won't always be able to use the spring you want: on small, high-frequency bumps, stiff springs will make the car bounce, resulting in a loss of grip. So you need softer springs, because they allow the tires to stay in contact with the ground. On smooth tracks however, stiff springs are the way to go, they will also help the car's jumping ability and responsiveness.
2.2 Damping
Damping is needed to absorb the energy associated with suspension travel. That suspension travel can be induced by bumps, or lateral or longitudinal acceleration. Without damping, the magnitude of the suspension movement would never stop increasing, leading to a very humorous situation. In terms of energy, damping absorbs most of the energy the car receives as it moves, unlike springs, who store the energy, and release it again. Imagine a car with no damping driving on a bumpy road. The subsequent impacts from the bumps on the tires would make the suspension bounce very intensely, which is not a good thing. Dampers absorb all the excess energy, and allow the tires to stay in contact with the ground as much as possible. This also indicates that the damping should always be matched to the spring ratio: never run a very stiff spring with very soft damping or a very soft spring with very stiff damping. Small changes however can give interesting results. Damping that's
a bit on the heavy side will make the car more stable; it will slow down both the vehicle's pitch and roll motions, making it feel less twitchy. Note that damping only alters the speed at which the rolling and pitching motions occur, it does not alter their extent. So if you want your vehicle to roll less, adjust the anti-roll bars, or the springs, but not the dampers.
Something you can adjust with the damping rate is the speed at which the suspension rebounds: if a car with soft springs but hard dampers is pushed down, it will rebound very slowly, and a car with stiff springs and light damping will rebound very quickly. The same situation occurs when exiting corners: in the corner, the weight is transferred, and the chassis has rolled and/or dived, but when the steering is straightened out, and the cornering force disappears, the chassis comes back to its original position. The speed at which this happens is controlled by the damping rate. So the car with the soft springs and hard damping will tend to want to continue turning when the steering is straightened. It will also tend to continue running straight when steering is first applied; it will feel generally unresponsive, yet very smooth. The car with firm springs and soft damping will be very responsive: it will follow the driver's commands very quickly and aggressively.
You may not always be able to use the spring and damping rates you'd like, because of bumps. Small, high-frequency bumps require soft settings for both damping and springs. You can't use such soft settings for big, harsh bumps, because the car would bottom out a lot, so you'll need to set your car a little stiffer. On very smooth tracks you can use very stiff settings for both springs and damping.
But it's not quite as simple as that: even in the simple dampers used in R/C cars, there is a difference between high-speed and low-speed damping. Maybe I should point out that the speed which is being referred to is the speed of the shaft in relation to the housing, not the speed of the car. In most full-scale cars, the difference is implicated by means of an array of spring-operated valves in the piston. In less sophisticated damper units, as used in R/C, the difference is an effect of the inherent properties of the fluid being used.
If there's anything a racing enthusiast needs to know about fluid dynamics, it's that there are two basic ways for a fluid to flow; laminar and turbulent. A flow is said to be laminar if the particles move parallel to each other, creating flow lines that never intersect. Laminar flow occurs when the velocity is low, the fluid has a high viscosity, and the surface is smooth and well-rounded. A flow is said to be turbulent if the particles move randomly, creating eddies. Situations where the velocity is high, the fluid is thin and the surface is rough favor turbulence. In case of turbulence, a lot more energy is required(or wasted, depends how you look at it) because there is a lot more friction between the particles. Also, for a laminar flow the pressure (resistance, in case of a damper) is proportional to the velocity of the fluid whereas in case of turbulence, it's proportional to the velocity squared. There is no strict distinction between the two types; there's a big gray area in between
.
To predict whether or not a flow is turbulent, the Reynolds number is used. It's defined as Re = D * V /n . D is the diameter, V is the velocity of the fluid, and n is its viscosity. If Re is smaller than 2000, the flow is most likely to be laminar, if it's in between 2000 and 4000 it's something in between, and if it's greater than 4000, the flow is most likely turbulent.
Now consider a typical R/C damper unit: you have oil of a certain viscosity passing through orifices of a certain diameter at a certain speed. Some oil flows around the outside of the piston, this is almost always laminar, since the gap between the piston and the housing is so narrow, so it creates a lot of drag. For the oil flowing through the holes in the piston however, it's hard to predict. When the shaft speed is very low it will be laminar, and when it's high it will be turbulent. Exactly when the transition will happen is hard to predict, but easy to feel: because the resistance of the shock is proportional to the shaft speed when the flow is still laminar, and proportional to the shaft speed squared the very next moment, when the flow has turned turbulent, it feels like a kind of hydraulic lock has occurred because the difference in resistance is usually quite substantial. The transition is sometimes also described as 'pack'; it feels as if the shock 'packs up'.
This effect can both be useful and unwanted: it can prevent your car from slapping the ground when landing from a jump, but it can also make your car bounce very badly over sharp ruts or bumps taken at high speed. So it's pretty important to get this adjustment right.
The way to achieve this is to select the right piston and shock oil: both the combination of a piston with small holes and a low viscosity oil and the combination of a piston with large holes and a high viscosity oil will yield the same static damping; it will feel the same when you bump your car by hand. It will also make the car handle the same in low-speed transitions, such as smooth cornering and low-frequency bumps. But the real difference is in the high-speed damping: the first combination will pack up very rapidly because of the low viscosity fluid and the increased fluid velocity. (the same amount of oil has to pass through smaller holes in the same amount of time, so its speed must be higher) The second combination will have a relatively high resistance to turbulence, because of the very thick fluid which flows at a much lower speed. Hence, turbulence will occur at much higher shaft speeds, or it may not occur at all.
So selecting the right piston and oil depends largely on the track layout. Killer jumps or chassis-wrecking bumps require pistons with small holes to prevent the chassis from slapping the ground and usually making the car very unstable. On the other hand, if the track has lots of bumps or is very rutted, any packing up of the shocks would make the car bounce and thus very unstable. In that case you should try pistons with large holes.
Note that judging if the holes in the pistons are too small or too large isn't as straightforward as you'd like it to be; because the shock absorbers aren't in direct contact with the ground, there is some elasticity to the whole suspension system. Suspension arms aren't infinitely rigid and neither are rims so expect a little flex, and hence also a little bounce from them. Then there there's some more elasticity in the tires, although this is a far less 'bouncy' form of elasticity. These effects are most apparent when your car lands off a big jump, and it bounces up a little, without the chassis having touched the ground. It means the pistons are way too small, which makes the shocks lock up too fast, so the impact has to be taken up by the elasticity in the suspension arms and the rims.
2.3 Roll center
Predicting how a car will react when forces are applied at the tires is not easy. The force can be absorbed, split, converted into a torque... by all sorts of suspension components. To avoid all of this you can try to find the roll center of your car and try to predict the reaction of the car from there. A roll center is an imaginary point in space, look at it as the virtual hinge your car hinges around when its chassis rolls in a corner. It's as if the suspension components force the chassis to pivot around this point in space.
Let's look at the theory behind it first. The theorem of Kennedy tells us that if three objects are hinged together, there are at most three poles of movement, and they are always collinear, i.e. they are always on one line. To understand what a pole really is, consider the analogy with the poles of the earth: as earth rotates, the poles stay where they are. In other words, the earth rotates around the imaginary axis that connects the two poles. Now this is a 3-dimensional analogy, in the case of the roll center we only need two dimensions at first. So a pole of an object (or a group of objects) is like the center point of a circle it describes.
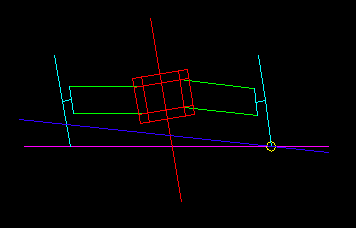
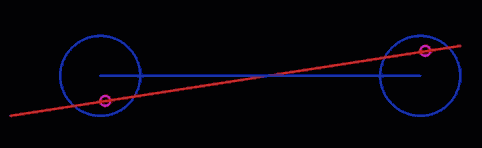
If we look at the suspension of a typical R/C car, with a lower A-arm and an upper link, we see a bunch of objects that are all hinged together. These objects include the chassis, the upper link, the A-arm, and the hub. For now we consider the hub, the axle and the wheel as one unit. First, let's look at the chassis, the upper link and the hub. They are hinged together, so the theorem of Kennedy applies. The pole of the upper link and the hub is the ball joint that connects them, because they both hinge around it. The pole of the upper link and the chassis is also the ball joint that connects them. So if we now look at the chassis, the upper link and the hub, we have already found two of the three poles, so if there is a third one, it should be on the imaginary line that connects the other two. That line is drawn in red on the next drawing.
The same applies to the bottom half of the suspension system, the pole of the lower A-arm and the hub is the outer hinge pin, the pole of the A-arm and the chassis is the inner hinge pin, so if there is a third pole it should be on the line that connects the other two. That line is also drawn in red . If your car uses ball links instead of hinge pins, the axis through the centers of the two balls makes up a virtual hinge pin.
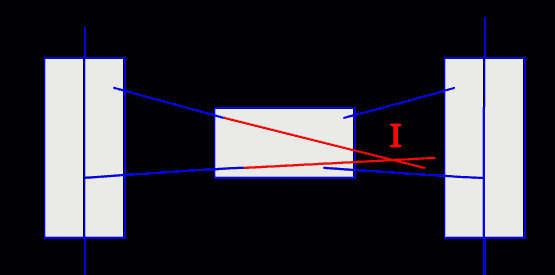
If the two red lines intersect, the pole of the hub/wheel and the chassis is the intersection point I . Point I is sometimes referred to as 'virtual pivot', or as 'instantaneous center'. This pole can give us information about how the suspension moves.
The distance from point I to the centerline of the tire is sometimes referred to as 'swing axle length' , it's as if the hub/wheel is attached to an imaginary swing axle which hinges around point I. Having that long swing axle would be equivalent to having the double wishbone-type suspension, but the actual construction would be very impractical. Nevertheless it serves as a good simplification. The swing axle length, together with the angle, determine the amount of camber change the wheel will experience during the compression of the suspension. A long swing axle length will cause very little camber change as the suspension is compressed, and a very short one will cause a lot.
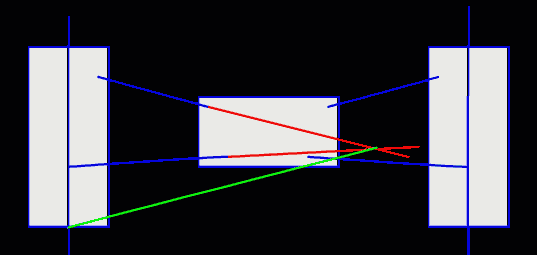
If the upper link and the A-arm are perfectly parallel to each other, the two red lines won't intersect, or, in other words, the intersection point I is infinitely far removed from the car. This isn't a problem though: just draw the green line (in the next drawing) parallel to the two red ones.
The two red lines should always intersect on the side of the center of the car, if they intersect on the outside, camber change will be bizarre: it will go from negative to positive back to negative, which is not a good thing for the consistency of the traction.
The wheel and the ground can also move relative to each other; let's assume the wheel can pivot around the point where it touches the ground, which is usually in the middle of the tire carcass. That point is the pole of the tire and the ground. As it is drawn, a problem might arise when the chassis rolls: the tires might also roll, and hence the contact point between the earth and the tire might shift, aspecially with square-carcass tires that don't flex much.
Now we can apply the theorem of Kennedy again: the ground, the wheel and the chassis are hinged together, we have already found the pole of the wheel and the ground, and the pole of the wheel and the chassis. If the pole of the ground and the chassis exists, it should be somewhere on the line that connects the other two poles, drawn in green in the next drawing.
The same procedure can be followed for the other half of the suspension, as in the picture below. Again a green line will be found the pole of the ground and the chassis should be on. The intersection point of the two green lines is the pole of the ground and the chassis. (Circled in purple)
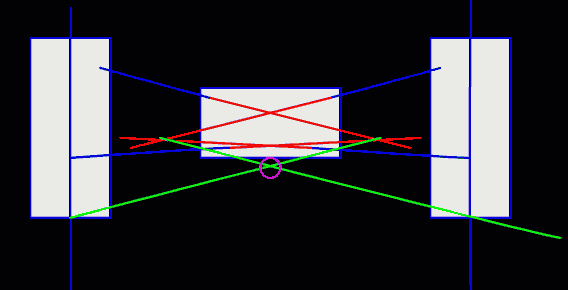
That point(purple), the pole of the chassis and the ground is also called the roll center of the chassis. It gives us information about how the chassis moves in relation to the ground. Theoretically, the ground could rotate around it while the chassis would sit still, but usually it's the other way around; the chassis rotates around it while the ground sits still.
The roll center is also the only point in space where a force could be applied to the chassis that wouldn't make it roll.
The roll center will move when the suspension is compressed or lifted, that's why it's actually an instantaneous roll center. It moves because the suspension components don't move in perfect circles relative to each other, most of the paths of motion are more random. Luckily every path can be described as an infinite series of infinitely small circle segments. So it doesn't really matter the chassis doesn't roll in a perfect circular motion, just look at it as rolling in a circle around a center point that moves around all the time.
If you want to determine the location of the roll center of your car, you can either 'eyeball' it by imagining the lines and intersection points, or you can get a really big sheet of paper and make a scale drawing of your car's suspension system.
Now that we know where the roll center (RC) is located, let's look at how it influences the handling of the car. Imagine a car, driving in a circle with a constant radius, at a constant speed. An inertial force is pulling the car away from the center point, but because the car is dynamically balanced, there should be a force equal but opposite, pulling the car towards the center point. This force is provided by the adhesion of the tires.
In principle, the inertia force works on all the different masses of the car, in every point, but by determining the center of gravity (CG) it's possible to replace all of the inertia forces by one big force working in the CG. It's as if the total mass of the car is packed into one point in space, the CG. If the CG is determined correctly, both conditions should be perfectly equivalent.
The forces generated by the tires can be combined to one force, working in the car's roll center.
Viewed from the back of the car, it looks like this:
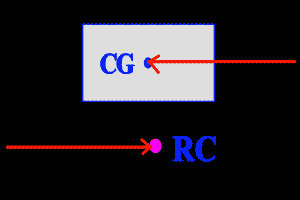
Two equal, but opposite forces, not working in the same point generate a torque equal to the size of the two forces multiplied by the distance between them. So the bigger that distance, the more efficiently a given pair of forces can generate a torque onto the chassis. That distance is called the roll moment. Note that it is always the vertical distance between the CG and the RC, since the forces always work horizontally.
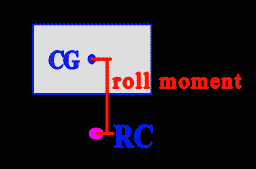
The torque generated by the two forces will make the chassis roll, around the roll center. This rolling motion will continue until the torque generated by the springs is equally big, only opposite. The dampers determine the speed at which this happens. Note that the roll torque is constant, well at least in this example where the turning radius is constant, but the torque supplied by the springs increases as the suspension is compressed. (See chapter 'springs') The difference between the two torque's, the resultant, is what makes the chassis lean. This resultant decreases because the torque supplied by the springs increases. So the speed at which chassis roll takes place always decreases, and it reaches zero when both torque's are equal. So for a given spring stiffness a big roll moment will make the chassis roll very far in the corners, and a small roll moment will make the chassis lean over less.
So at any given time, the size of the roll moment is an indication of the size of the torque that causes the chassis to lean over while cornering.
Now; a different problem arises; the location of the roll center changes when the suspension is compressed or extended, most of the time it moves in the same direction as the chassis, so if the suspension is compressed, the RC drops.
This little animation shows how the height of the RC changes as the suspension is compressed. The height of the CG also changes a little, because the position of all of the unsprung mass changes relative to the chassis changes. So it's really hard to tell if the roll moment actually increases or decreases.
Also, when the car corners, and the chassis leans over, the RC usually moves away from the chassis' centerline.

Most R/C cars allow for the length and position of the upper link to be changed, and thus change the roll characteristics of the car. The following generalizations apply in most cases. An upper link that is parallel to the lower A-arm will make the RC sit very low when the car is at normal ride height, hence the initial body roll when entering a corner will be big. An upper link that is angled down will make the RC sit up higher, making the initial roll moment smaller, which makes that particular end of the car feel very aggressive entering the corner. A very long upper link will make that the roll moment stays more or less the same size when the chassis leans over; that end of the chassis will roll very deeply into the suspension travel. If not a lot of camber is used, this can make the tires slide because of excessive positive camber. A short upper link will make that the roll moment becomes a lot smaller when the chassis leans; the chassis won't roll very far.
Until now, we've ignored the fact that there are two independent suspension systems in a car; there's one in the front and one in the rear. They both have their own roll center. Because the 'chassis' parts of both systems are connected by a rigid structure, the chassis, they will influence each other. Some people tend to forget this when they're making adjustments to their cars; they start adjusting one end without even considering what the other end is doing. Needless to say this can lead to anomalies in the car's handling. Having a very flexible chassis can hide those anomalies somewhat, but it's a far cry from a real solution.
Anyway, the front part of the chassis is forced to hinge on the front RC, and the rear part is forced to hinge on the rear RC. If the chassis is rigid, it will be forced to hinge on the axis that connects both RCs (purple), that axis is called the roll axis. (red)
The position of the roll axis relative to the cars CG tells a lot about the cornering power of the car; it predicts how the car will react when taking a turn. If the roll axis is angled down towards the front, the front will roll deeper into its suspension travel than the rear, giving the car a 'nose down' attitude in the corner. Because the rear roll moment is small relative to the front, the rear won't roll very far; hence the chassis will stay close to ride height. Note that with a car with very little negative suspension travel (droop) the chassis will drop more efficiently when the car leans over. With the nose of the car low and the back up high, a bigger percentage of the cars weight will be supported by the front tires, more tire pressure means more grip, so the car will have a lot of grip in the front, making it oversteer. A roll axis that is angled down towards the rear will promote understeer. Remember that the position of the roll centers is a dynamic condition
, so the roll axis can actually tilt when the car goes through bumps or takes a corner, so it's possible for a car to understeer when entering the corner, when chassis roll is less pronounced, and oversteer in the middle of the corner because the front RC has dropped down a lot. This example illustrates how roll center characteristics can be used to tune a car to meet specific handling requests, from either the driver or the track.
In general, you could say that the angle of the upper link relative to the A-arm determines where the roll center is with the chassis in its neutral position, and that the length of the upper link determines how much the height of the RC changes as the chassis rolls. A long, parallel link will locate the RC very low, and it will stay very low as the car corners. Hence, the car (well at least that end of the car) will roll a lot. An upper link that's angled down, and very short will locate the RC very high, and it will stay high as the chassis rolls. So the chassis will roll very little. Alternatively, a short, parallel link will make the car roll a lot at first, but as it rolls, the tendency will diminish. So it will roll very fast at first, but it will stop quickly. And a long link that's angled down will reduce the car's tendency to roll initially, but as the chassis rolls it won't make much of a difference anymore.
In terms of car handling, this means that the end where the link is angled down the most (highest RC) has the most grip initially, when turning in, or exiting the corner, and that the end with the lowest RC when the chassis is rolled will have the most grip in the middle of the corner. So if you need a little more steering in the middle of the corners, lengthen the front upper link a little. (Be sure to adjust camber afterwards) If you'd like more aggressive turn-in, and more low-speed steering, either set the rear upper link at less of an angle, or increase the front link's angle a little.
Now you might ask yourself: what's the best, a high RC or a low one? It all depends on the rest of the car and the track. One thing is for sure: on a bumpy track, the RC is better placed a little higher; it will prevent the car from rolling from side to side a lot as it takes the bumps, and it will also make it possible to use softer springs which allow the tires to stay in contact with the bumpy soil. On smooth tracks, you can use a very low RC, combined with stiff springs, to increase the car's responsiveness and jumping ability. More about this in chapter 6.
2.4 Anti-squat
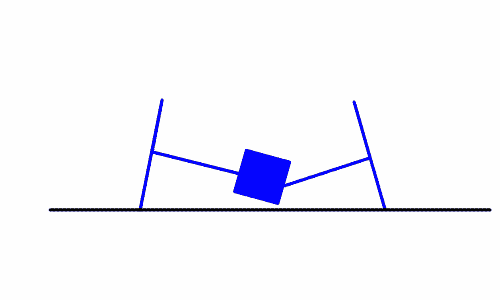
Anti-squat describes the angle of the rear hinge-pins relative to the horizontal plane. Its purpose is to make the car squat less when accelerating. (Squatting is when the rear of the car drops down when the car accelerates)
More anti-squat will give more 'driving traction': there will be more pressure on the rear tires as you accelerate, aspecially the first few meters. At the same time, it will give more on-power steering, because the car isn't squatting much. The disadvantage is that the car has an increased tendency to become unstable entering corners, aspecially in the rear. Reducing the anti-squat angle has the opposite effect: a lot less on power steering, and more rear traction when the car isn't accelerating as much anymore. The car will also be a lot more stable entering corners. It also affects the car's ability to handle bumps: more anti-squat will cause the car to bounce more when accelerating through bumps, but it will increase the car's ability to absorb the bumps when coasting. Reducing the anti-squat does the opposite: it improves the car's ability to soak up the bumps under power, but reduces it while coasting.
2.5 Ride height
Proper ride height is very important, too low and the vehicle will bottom out a lot, too high and the risk of traction rolling will be unnecessarily big. Equal ride height front and rear is a good starting point. Raising or lowering ride height on one end of the car changes the steering characteristics of the car, the lowest end will have a slightly bigger percentage of the cars static weight. But, more importantly, the roll center will also be lowered, making that particular end of the car roll deeper when the car corners, making it sit even lower and thus having more grip.
You should also be aware that changes in ride height usually influence the amount of down-travel too, which, as explained in the next section, can have serious consequences.
2.6 Suspension travel
The amount of negative suspension travel (downtravel) a car has can have a huge effect on its handling; it influences both the mount of roll and the amount of pitch the chassis will experience.
In this animation we see a car with a lot of downtravel as the chassis rolls into a turn. The chassis is free to roll, and the height of the CG doesn't change very much.

In this animation we see a car with almost no downtravel as it rolls into a turn. The chassis is pulled down as it rolls, effectively lowering the CG.
So, if one end of the car has less downtravel than the other, that end will be forced down more in a turn, which makes for more grip at that end, aspecially in the middle part of the turn, where weight transfer is more pronounced. Very little downtravel at the front will give a lot of steering, aspecially when entering a corner at high speed, or very violently. Very little downtravel at the rear will give a lot, and consistent traction throughout the turn.
But that isn't all there is to it: the amount of suspension travel also influences the car's longitudinal balance, i.e. when braking and accelerating. An end with a lot of downtravel will be able to rise a lot, so chassis pitch will be more pronounced, which in turn will provide more weight transfer. For example: if the front end has a lot of downtravel, it will rise a lot during hard acceleration, transferring a lot of weight onto the rear axle. So the car will have very little on-power steering, but a lot of rear traction. A lot of downtravel at both ends, combined with soft springs, can lead to excessive weight transfer: on-power understeer, and off-power oversteer. The cure is simple: either reduce downtravel, or use stiffer springs.
There are also some disadvantages of having very little suspension travel: the bump handling and the car's jumping ability may suffer, it will bottom out very easily.
2.7 Anti-roll bars
Anti-roll bars are like 'sideways springs', they only work laterally. Here's how they work: if one side of the suspension is compressed, one end of the bar is lifted. The other end will also go up, pulling the other side of the suspension up also, basically giving more resistance to chassis roll. How far and how strongly the other side will be pulled up depends on the stiffness and the thickness of the bar used: a thin bar will flex a lot, so it won't pull the other side up very far, letting the chassis roll deeply into its suspension travel. Note that the bar only works when one side of the suspension is extended further than the other, like when the car is cornering. When both sides are equally far compressed, like when the car is braking, the bar has no effect. So anti-roll bars only affect the lateral balance of the car, not the longitudinal balance.
Unfortunately, anti-roll bars aren't the only things affecting the car's roll stiffness; they work in conjunction with the springs and dampers. Suppose you add an anti-roll bar at the rear of your car without changing any of the other settings. When the car enters a turn, the chassis starts to roll. Normally, the suspension on the outside of the turn would compress, and the one on the inside would extend, making for a lot more pressure on the outside tire. With the anti-roll bar however, the suspension on the inside will be compressed, so the chassis will roll less, and the rear of the car will sit lower than normal. So the rear has more weight on it, and it's distributed more evenly over the two tires. This makes for a little more, and more consistent traction. Remember that this is in the beginning of the turn, the situation is different in the middle of the turn. Normally, without the anti-roll bar, the chassis would stop rolling when the roll torque is fully absorbed by the outsid
e spring. But with the anti-roll bar, some of that torque is absorbed by the anti-roll bar, and used to compress the inside suspension. So the outside suspension won't be compressed as much as it normally would, making the rear of the chassis sit up higher than normal, so less weight is on the rear of the car, and more at on the front. It's as if suddenly the rear has become stiffer, making for more steering and a little less rear traction. Rear traction is more consistent however, because the weight is distributed more evenly over the rear tires, unless the track is really bumpy, that is; anti-roll bars can really mess up a car's rough track handling, so they're rarely used on bumpy tracks. Adding an anti-roll bar at the front of the car has a similar, but opposite effect: it decreases steering, but makes it much smoother and more consistent. It can stop the front from 'biting into' the surface too much, making the turning radius big and smooth. This can come in handy on large, wide tracks.
Math-wise, the torsion stiffness of the middle part of the bar goes up with the fourth power of the bar's diameter, and for the two side parts, torsion stiffness goes up with the square of the diameter. Keep this in mind while changing anti-roll bars.
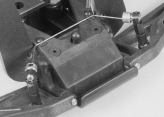
2.8 Shock mounting locations
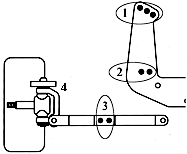
Most R/C vehicles have several possible mounting points for the shock absorbers, both at the upper mount (area 1)and at the A-arm.(area 3) By mounting the shocks in a different position, spring action can be altered. The question is: how will this affect the handling, or the 'feel' of the car? To understand this, first you need to know about wheel rates.
A wheel rate is an equivalent spring rate at the wheel; it's the spring rate of a spring that would give the same stiffness as the current one, if it was to be attached right at the centerline of the wheel. After all, that's where the traction forces act: at the wheel.

A wheel rate is defined as motion ratio˛ * spring rate * sin(spring angle), and motion ratio is the distance between the lower shock mounting position and the inner hinge pin divided by the distance between the inner hingepin and the tire's centerline. The spring angle is the angle between the shock and the lower A-arm.
Or: wheel rate = spring rate * (D1/D2)˛ * sin a
This formula tell us two things:
1.The more the shocks are inclined, the softer the wheel rate.
2.The closer the bottoms of the shocks are mounted to the middle of the chassis, the softer the spring rate.
Note that if you change the lower shock mounting location, you change both the shock angle and the motion ratio, but it's usually the change in motion ratio that has the biggest effect. This also shows in the formula: the motion ratio is squared, and the spring angle isn't . The amount of suspension travel also changes, which can also affect the car's handling.
The shock angle isn't constant either: it gets bigger as the suspension is compressed. This effect is more pronounced as the shocks are more laid down, so the more inclined the shocks are, the more progressive the wheel rate will be. So think of the top mounting positions as a means of fine-tuning spring and damper rates, and changing the progressiveness.
Keep in mind this isn't perfectly correct: if the centerline of the tire doesn't intersect with the outer hinge pin, a considerable part of the forces acting on the tire are transmitted to the chassis along the upper link. Nevertheless, it's a very good approximation.
Since the shocks' angle changes their progressiveness, it also influences the shaft speed: if the shock is laid down(progressive), shaft speed will increase as the shock is compressed, if it is close to vertical(linear), shaft speed won't vary a lot with suspension travel. Obviously, this affects high-speed damping too; it affects when the transition from low-speed to high-speed damping occurs. It will occur earlier when the shock is closer to vertical, because when it is inclined, it takes some time (and some positive suspension travel) for the shaft to 'speed up', and reach the same shaft speed. So inclining the shocks more has more or less the same effect as using a piston with slightly bigger holes, and mounting it more upright has the same effect as using a piston with slightly smaller holes.
I find that changing the lower mounting location of the shocks comes in handy sometimes when you want to change the amount of negative suspension travel, but you don't feel like altering the length of the shock, or when you need the springs to be just a little stiffer or softer. Changing the top mounting location is a very subtle adjustment, I like to change it after all of the other, more important adjustments have been made, and the car is handling more or less the way I want it to. It's aspecially helpful to alter the 'feel' of the steering entering corners. Now I don't know if this applies when the springs' action is very progressive, but the more the shocks are stood up (less inclined), the more direct their action will be entering the corner. For instance: if the front shocks are close to vertical, and the rears are somewhat laid down, the car will have a lot of turn-in steering; it will be very responsive. If the rears are close to vertical ,and the fronts are more laid down, t
he car won't have a lot of turn-in, but it will have more steering in the middle of the turn; it will 'square'. In some cases, the rear might actually begin to slide. It works much in the same way as having stiff springs or heavy damping: if you have stiff springs, or heavy damping up front, the initial reaction when you enter a turn will be very strong. In the middle part of the corner the car will probably understeer, but it's the initial reaction that gives the car a 'responsive' character. Even roll center works this way: a very high roll center in the front will make the car turn in very aggressively, but understeer in the middle of the corner. It's nice if you like an aggressive car you can 'throw' into the corners, but I doubt it's the fastest way round the track. Conversely, if the rear roll center is set very high, the car will turn in very gently, and possibly oversteer after that.