My homepage

GPGshell
Versione italiana disponibile
GPGshell is a graphic interface that
allows you to use the cryptographic software GnuPG
in a easy and user friendly way.
Its goal is encrypting/decrypting files and/or email messages, but also signing them ( or verify their sign ).
This software's creator is that untamed Roger Sondermann who since from 2000 churnes out new versions of this front end,
and every version is more complete and easy to use than the previous ( last versions allow the user to create even SDA files)
GPGshell's web site is at www.jumaros.de , where you can download it for free in the proper section of the page. GPGshell
doesn't have any restrinction for private or commercial use.
The software runs on every Windows System ( 95 - 98 - Me - NT - XP ) and at the moment I'm writing this article the last
version is 3.10, released on 2/03/2004.
Downloading
As I told before, the software is
downloadable at the official
site but you can also find it at Simtel (3.02)
File's dimension (zip) are very limited for version 3.01, only 1962 Kb.

Once you downloaded gpgsh301.zip file, you must estract it with some tool like 7-Zip (Freeware e Open Source) Izarc
Winzip Powerarchiver or some other stuff like that.

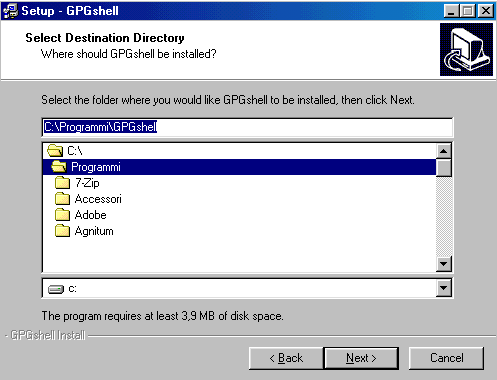
Once you downloaded it, you should extract in in a folder of your choice, f.i. C:\Programs\GnuPG or C:\GnupG.
That's all. The older GPGshell versions required a autoexec.bat file's modification but now it's not necessary.
Now you only have to install GPGshell, and at the end of this you'll be asked to insert the path of the folder where you
extracted gpg.exe.
Then it will be GPG itself to handle the system's registry in order to introduce even the modification asked by the previous
versions of GPG shell.
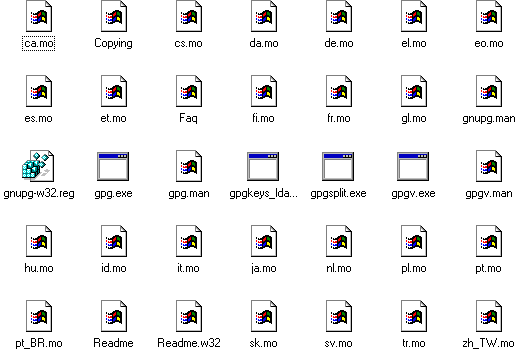
Here under you can see the file's content. Just in case you were wondering, .mo files are related to the language; if you want
you can delete every .mo file, except for those which interest you ( it.mo for italian and so on ).
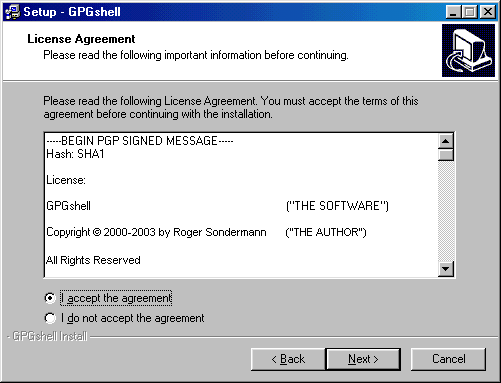
You must read and accept the license Agreement
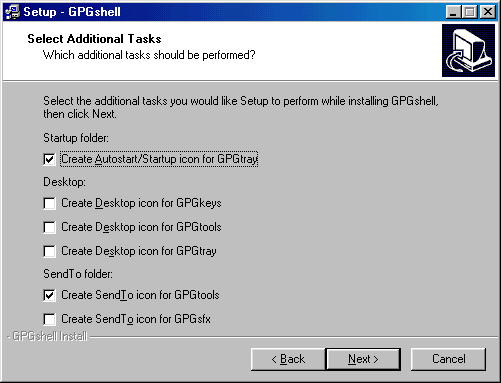
In the next picture you can see the various choice you can have for your desktop and tray icons; it's also possible to create a
link to the really interesting GPGsfx tool (coded SFX) on Send To: I suggest this option.
Now starts the real installation
At the end you must restart windows

After you restarted

If you right click on GPGshell icon you'll see a menu:
If you want to remove ( or introduce ) GPGshell from mouse menu, or if you want to associate a file extension to GPGShell you
must click on the proper writing space until it becomes blue and then click on the push-button.
Then click on OK. Generally restart is required.
If you need to create your first key with GPGshell click on GPGKeys icon on desktop or on Start menu - Programs -
GPGshell. - You'll see a keyring opening..
First time you launch GPGKeys you'll be asked if you are importing an existing keyring; if you choose "NO" you'll see an empty
keyring opening.

In order to create a key you should hit CTRL+ N or you can click on Key/i and then choose "New"

It will appear a DOS window, where you'll be asked which kind of key you want to create. You have 3 options: the default is
creating a DSA and Elgamal key ( coding and signing ). If you want this, write 1 ( one ) and hit Enter.
Now you have your last chanche to modify the data you entered ( just in case you made some mistakes or you changed your
mind ) without resetting the key's creation and start again from zero.
If everything is right, click on the O ( O like Ontario ) key to go to next step, in which you'll be asked to choose a password to
protect your key fron anauthorized use.
Here below you can see the password field: I'd like to say that a good password is made at least of 8 charachters as letters,
numbers and special characters.
I suggest to create an exclusive password, different from the ones you use for email or istant messaging.
I must say that a message encrypted with a passphrase like "Momma" is secure just like one created with something like
"d4h§3782\Y0344X@àò^".
The only difference is that with the last passphrase takes much more time and efforts for the malicious users which try to crack
it.
If someone gets your key because he has physical access to your pc ( or gets it from Internet using a trojan or a software
vulnerability ), the choice of the passphrase can make the big difference.
You should choose a good trade off between security and easyness of use, without reaching exaggerations that bring you to
write an entire book as passphrase when you encrypt or sign a message or a file, or, and that's even worst, writing it on a note
and leave it near your pc.
.
The program suggest to type on the keyboard, move the mouse and perform actions like these ( opening folders or files )
during the key's generation process, in order to have a good entropy ( a random data generation ).
At the end of this step you'll be prompted and you can close the DOS window .
Now you can reach again the keyring (GPGkeys) and find your newly created : the yellow identifies it as a DSA key.
If you select the key you can ( mouse's right click) have access to different options.

Creating a GPG-SFX file with GPGshell
GPGshell includes the interesting possibility to create self extracting cryptated files (something like SDA on PGP ).
This can be very useful if you must send cryptated messages and/or files to a user that doesn't have a cryptographic program
which is compatible with PGP/GnuPG or that can't use it.
We are talking about a self extracting SFX file, which requires a password to be open. Clearly, the password won't be sent
with the file, but you can communicate it to the user by phone or you two should have agree on it before.
In order to use this option, in the previous version you should have downloaded some files and extract them in specific folders,
but since 3.00 version everything's included in the installation, so you don't have to download anything else.
If you ( or the addressee ) aren't a cryptography's expert and you need to send confidential data by email ( like banking or
medical ), this SFX options can be definitely useful.
I'd like to remember that in Italy, for istance, there are laws about privacy that stat clearly that Medical Centres must "adopt
crypting tools" in order to protect confidential data.
Enter the password and then hit Enter again.
The document which is "inside" the SFX file will be extracted and you can hit any key to close the DOS window.

choose too short passwords.
Remember also that to encrypt an SDA you must never use as password the same passphrase you used with GnuPG. If you're
used to handle SDA files to transfer confidential documents ( particularly financial ones ), you'd better use a new password
everytime you send a file; be sure you communicate it to the addressee, however.
Remember that every email message, while travelling from sender to addressee, pass through a large number of servers: there is
always the chanche that who has access to these servers to see these messages and their attachments and, of course, to copy
them and try to decrypt them.
If the whole digest obtained by the phone call comunications is perfectly similar to the one contained in the received file, the
Bank B operator will launch the SDA file, entering the password and decrypting it.
Why making ourselves sure that the file is the same?
There are a lot of reasons for making it: there is the possibility to change the SDA file in attachment with another, there is the
chanche that the file can be maliciously or accidentally infectyed ( there are a lot of virus that infect .exe files ); there is also the
possibility that someone is trying to get the password: a malicious user can "catch" the SDA file and attach a backdoor to it,
which can steal the password or gain control of the addressee pc.
This last possibility is much more likely to happen than the chance to violate an encrypted file.
If all I'm saying appears paranoid to the common internet user, remember that there are people that work and gain a lot with the
computer, like the banks, or people that do very confidential studies or researches. For them security is crucial ($$$).
The crytical aspects in the whole operation are two: one is verifying that the file received is the same that has been sent, the
other is the password communication between the two users*.
* ( sending the password by email with the file attached is simply absurd; it's absurd either if you send it in another email, if you
don't encrypt the message )
Password exchange between users can be done by phone or, in a much more secure way, you can prepare two identical lists
of passwords, written on a paper sheet. The two users can have both the list and they can communicate by phone, telling just
what number of the list is the password chosen for that particular SDA file. It's much more easy to corrupt a phone operator
than to decrypt a file coded with a good password.
File's dimension (zip) are very limited for version 3.01, only 1962 Kb.
Once you downloaded gpgsh301.zip file, you must estract it with some tool like 7-Zip (Freeware e Open Source) Izarc
Winzip Powerarchiver or some other stuff like that.
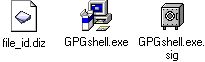
Here above you can see the zip file's
content: you'll have 3 files, one is a .diz with release notes (
you can open it with a txt
editor or you can use the Freeware software GetDiz ); the other file you get is setup, that allows you to install GPGshell, while
the third file is a .sig and allows you to verify that the .exe file is trusted and not counterfeited
To make yourself sure of this you must have in your keyring Roger Sondermann's key and you must have something like
GnuPG or PGP.
If you don't have any of these tools you can install the program , but make yourself sure of the setup's origin*
* (it's better to download GPG shell only from the official site or from links you find on the official site, beware of other's site downloads or emailed files ).
Before you start the setup, I'd like to remind you that GPGshell needs GnuPG in order to run correctly, particularly this 3.01
version of which I'm talking about requires at least GNUPG 1.2.2 -1.2.3 or the most recent 1.2.4.
So you have two choices:
1) You don't own GnuPG, so go on reading to see how to download and install it.
2) You run a recent version of GnuPG on your PC, so you can jump to "Installing GPGShell" section.
Downloading
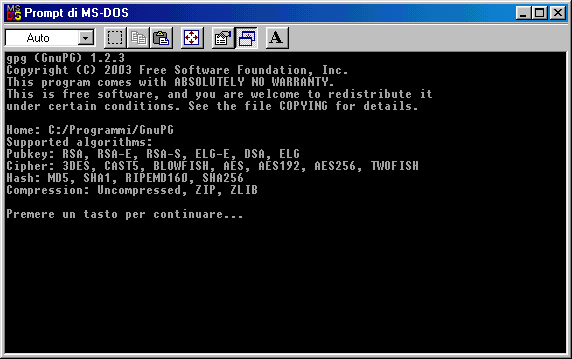
GnuPG
Gnu Privacy Guard is the Freeware e Open
Source PG's successor; it comes without restrinctions and you can use
it for
private or commercial use.
The official site for downloading it is www.gnupg.org. It's a small program and it works only in text mode, so if you're not
comfortable with this you'd better use GUI's interfaces like GPGshell or WinPT , that are more user friendly with coding or
signing. - GnuPG is a multiplatform program but here we'll choose the Windows version (1,27 Mb).
Once you downloaded it, you should extract in in a folder of your choice, f.i. C:\Programs\GnuPG or C:\GnupG.
That's all. The older GPGshell versions required a autoexec.bat file's modification but now it's not necessary.
Now you only have to install GPGshell, and at the end of this you'll be asked to insert the path of the folder where you
extracted gpg.exe.
Then it will be GPG itself to handle the system's registry in order to introduce even the modification asked by the previous
versions of GPG shell.
Here under you can see the file's content. Just in case you were wondering, .mo files are related to the language; if you want
you can delete every .mo file, except for those which interest you ( it.mo for italian and so on ).
---
Installing GPGshell

Installing GPGshell
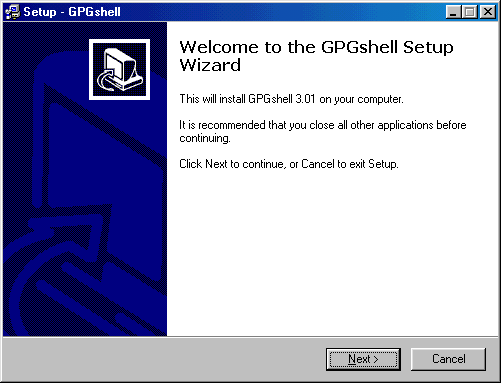
Now
we have everything we need to install Gshell,
you only have to double click on set up
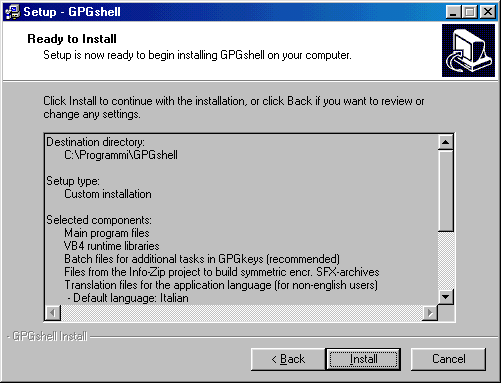
You must read and accept the license Agreement
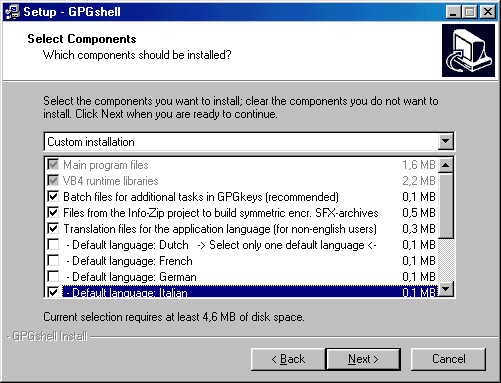
You'll be asked on the components to
install: I suggest to leave everything as default and choose "custom";
remember that VB4
libraries are required to run GPGShell; remember also to choose your default language ( see below ).
libraries are required to run GPGShell; remember also to choose your default language ( see below ).
In the next picture you can see the various choice you can have for your desktop and tray icons; it's also possible to create a
link to the really interesting GPGsfx tool (coded SFX) on Send To: I suggest this option.
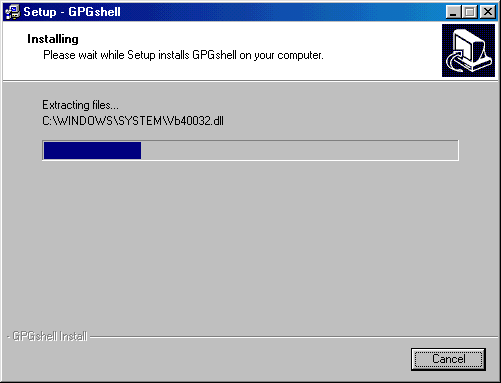
Now starts the real installation
At the end you must restart windows
After you restarted
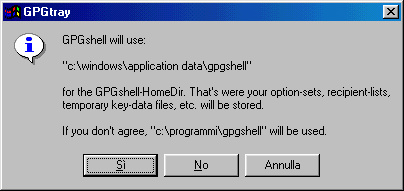
Once you restarted your PC you'll see
the window below: there are 3 options, Yes, No and Cancel.
Choose Yes to continue. The difference between choosing Yes or No is only in the location of the temporary files that
GPGshell will create when in use.
If you choose Yes, these files will go in the default path (C:\Windows\application data\gpgshell) .
Now we have to tell to GPGshell where gpg.exe is ( GnuPG folder ), so enter the correct path. If you didn't extract GnuPG in a
folder, do it now.
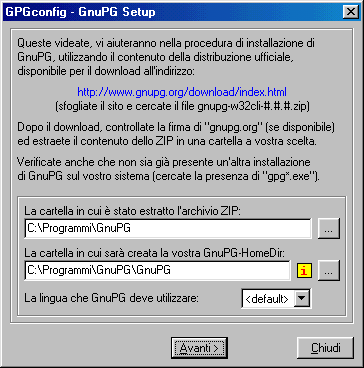
Now you can enter the path of the folder where you extracted GNUPG' .zip file.
You'll see the window shown below
Choose Yes to continue. The difference between choosing Yes or No is only in the location of the temporary files that
GPGshell will create when in use.
If you choose Yes, these files will go in the default path (C:\Windows\application data\gpgshell) .
Now we have to tell to GPGshell where gpg.exe is ( GnuPG folder ), so enter the correct path. If you didn't extract GnuPG in a
folder, do it now.
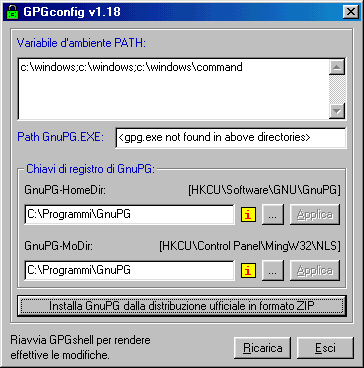
Now you must click on " Install GNUPG
fron the distribution
ZIP-archive"
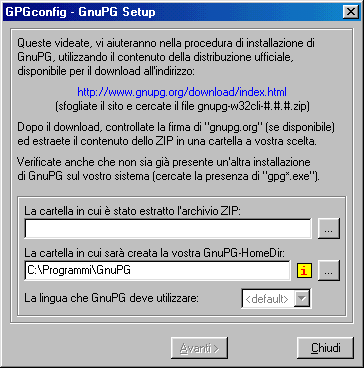
You'll see the window shown below.
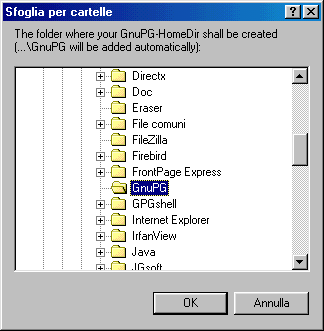
Click on "Browse" button  on the "The folder
to wich
the
ZIP-archive has been extracted"'s right.
on the "The folder
to wich
the
ZIP-archive has been extracted"'s right.
on the "The folder
to wich
the
ZIP-archive has been extracted"'s right.Now you can enter the path of the folder where you extracted GNUPG' .zip file.
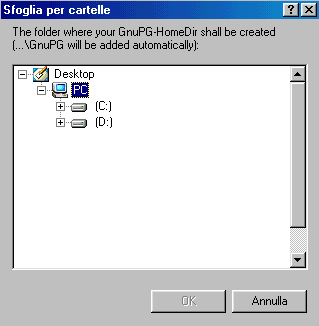
Click on the "+" symbol to expand the
tree structure and at the end choose OK.
You'll see the window shown below
Choose OK and you'll see another window:
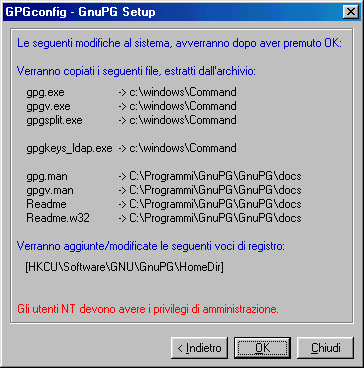
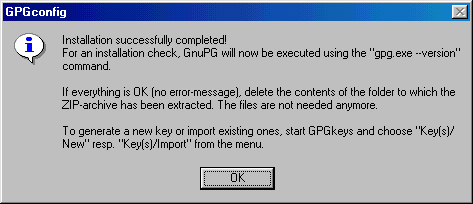
Now you only need to choose OK again and
you'll be prompted that the installation is completed. Here below you
can see the
confirmation message.
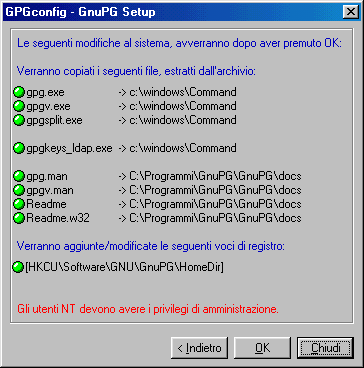
GPGshell's system modificationconfirmation message.
Then you'll see this DOS window and you
should only hit any key
Istallation is completed, you'll see
only the window shown below and you can click on Exit.
---
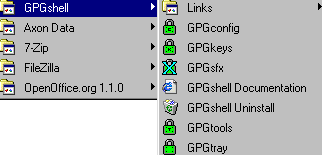
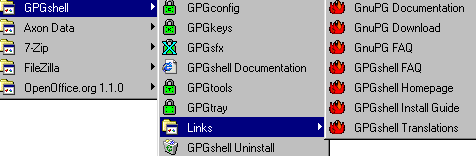
You can find GPGshell folder on Start
menu; in the Links sections
you can find the web link for the FAQ, for the online
documentation and other stuff.
documentation and other stuff.
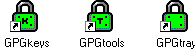
On your desktop you'll find ( if you
chose to install them ) 3 new green padlock icons:
You'll find GPGshell on the mouse menu
also, with an icon that changes colour if selected.
If you choose "Other" you'll find another menu, with other options and SFX functions.
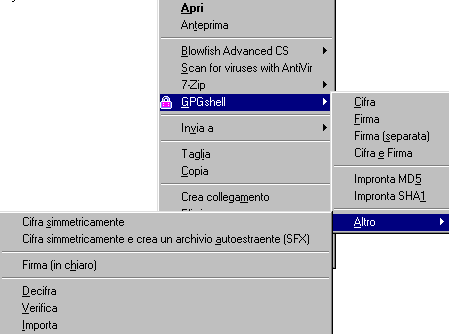
If you choose "Other" you'll find another menu, with other options and SFX functions.
GPGshell runs at Windows start, so you
can see its green padlock tray near the clock ( GPG Tray ).
---
Now you can click on GPGtray on Start
Menù and ( if everything is gone well ) you'll see the green
padlock near the clock.

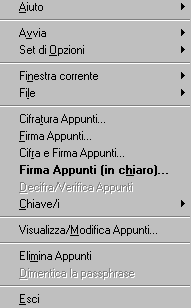
If you right click on GPGshell icon you'll see a menu:
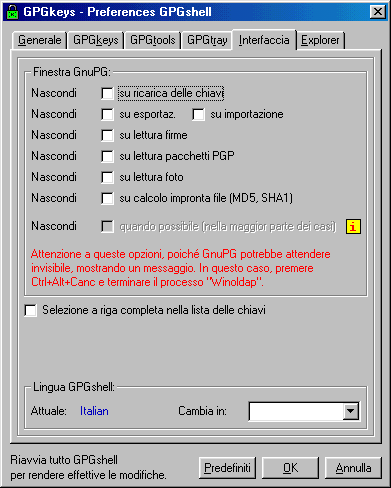
Some
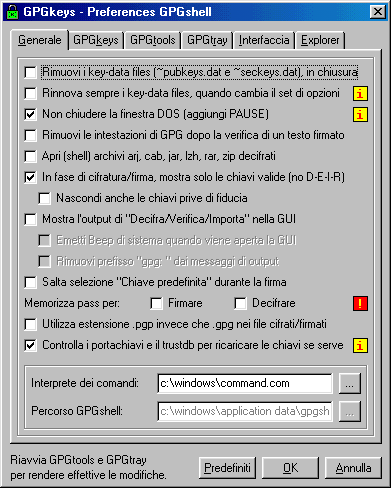
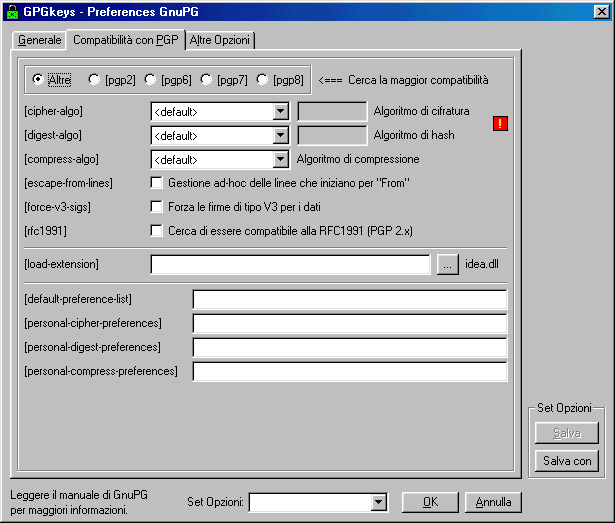
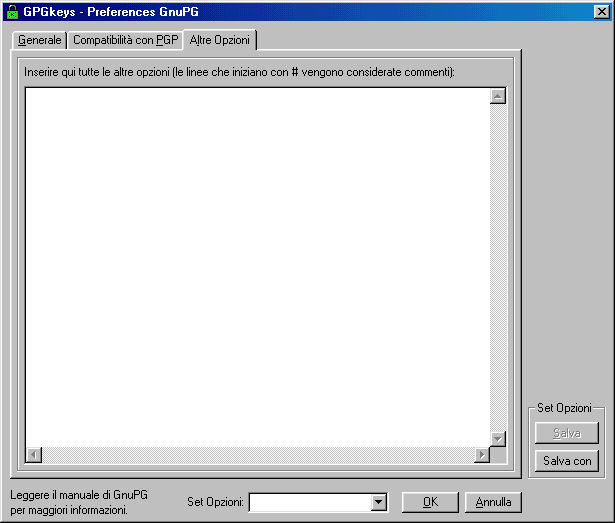
preference option's window ( sorry, in italian )
On the menu I was talkin about, you can
handle GPGshell's Preferences
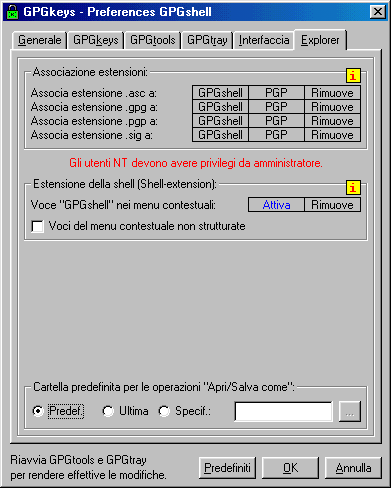
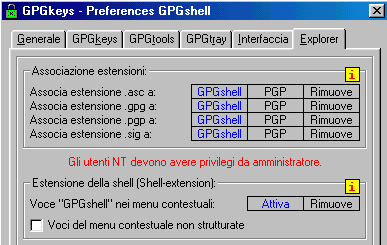
As you see below, it is possible to
associate ( or not ) to GPGshell various file's extensions like .asc
.gpg .sig and .pgp or
remove them. - If you want, you can also remove GPGshell from mouse menu.
remove them. - If you want, you can also remove GPGshell from mouse menu.
If you want to remove ( or introduce ) GPGshell from mouse menu, or if you want to associate a file extension to GPGShell you
must click on the proper writing space until it becomes blue and then click on the push-button.
Then click on OK. Generally restart is required.
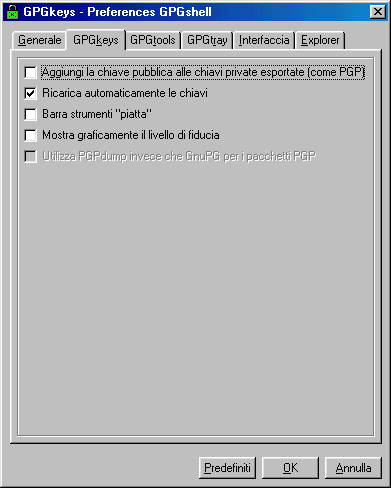
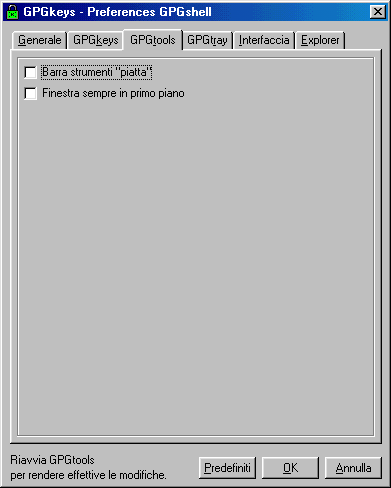
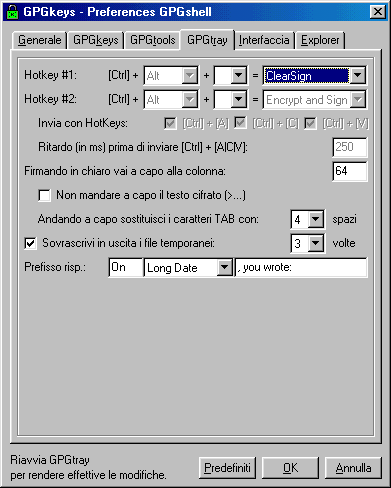
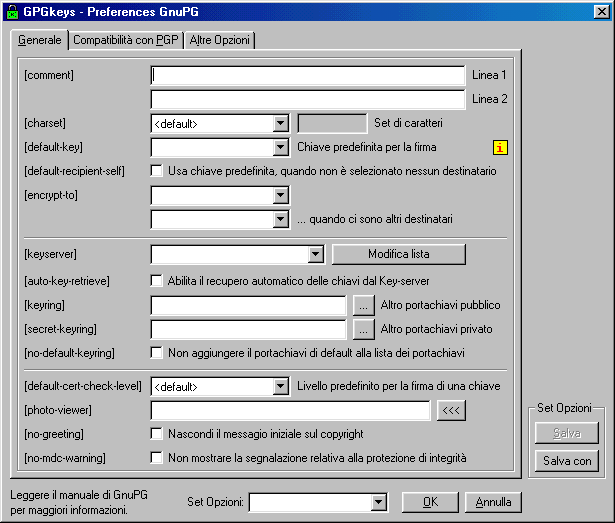
Others
GPGshell Preference's windows ( GnuPG part )
Creating
a key with GPGShell
If you need to create your first key with GPGshell click on GPGKeys icon on desktop or on Start menu - Programs -
GPGshell. - You'll see a keyring opening..
First time you launch GPGKeys you'll be asked if you are importing an existing keyring; if you choose "NO" you'll see an empty
keyring opening.
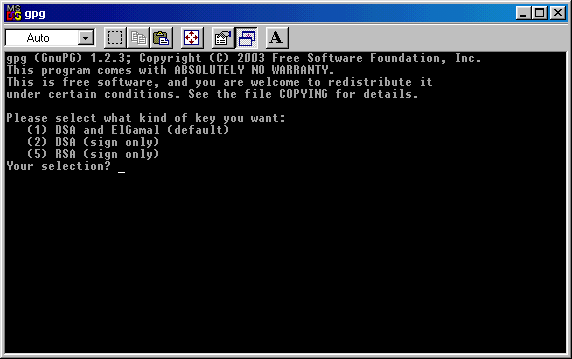
In order to create a key you should hit CTRL+ N or you can click on Key/i and then choose "New"
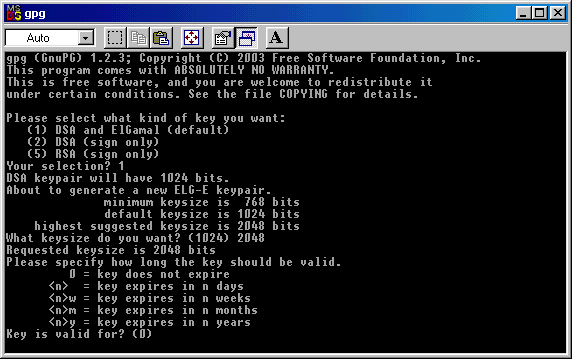
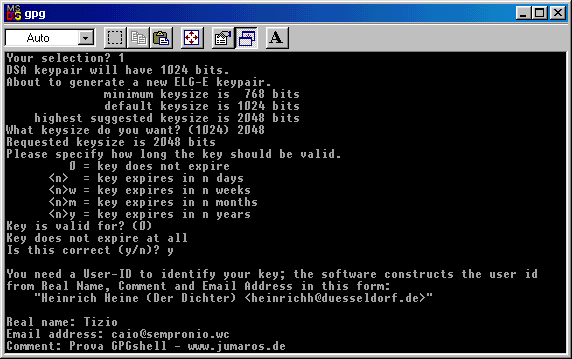
It will appear a DOS window, where you'll be asked which kind of key you want to create. You have 3 options: the default is
creating a DSA and Elgamal key ( coding and signing ). If you want this, write 1 ( one ) and hit Enter.
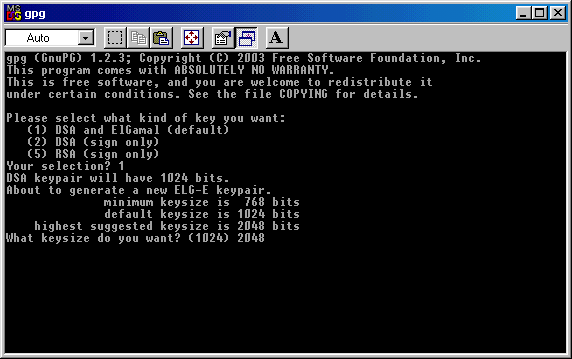
Then you'll be asked how big this key
must be: the default choice is 1024 bits. In this example I choose to
create a bigger key
(2048); after you entered the key's dimension, click again on Enter to proceed.
If you like you can create even a 4096 bits's key, but 2048 is more than enough.
(2048); after you entered the key's dimension, click again on Enter to proceed.
If you like you can create even a 4096 bits's key, but 2048 is more than enough.
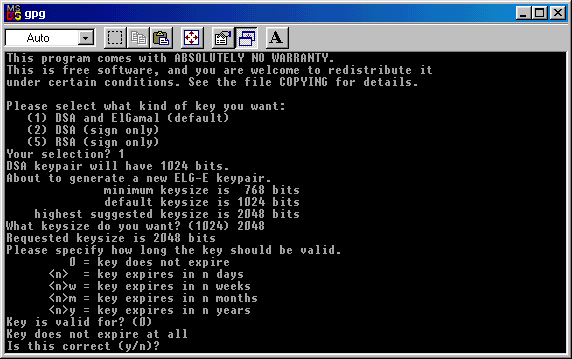
Now you must choose if your key must
have an expiring date or not.
If you hit 0 ( zero ), your key will be without expiring date.
If you hit 0 ( zero ), your key will be without expiring date.
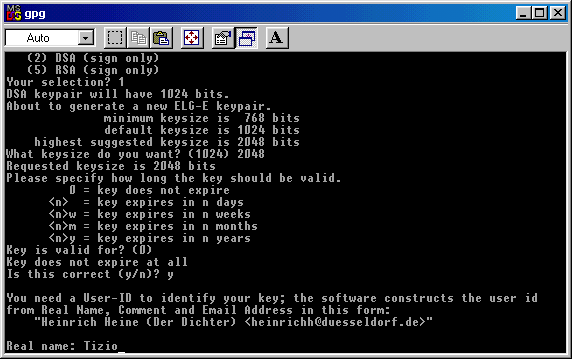
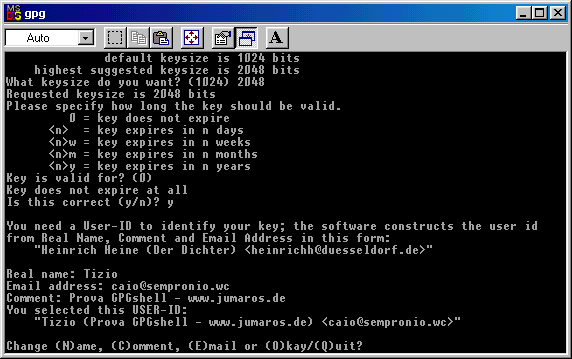
You must confirm that you want an
"endless" key: write Y (Yes ) and cick on Enter to proceed.
Now you must enter a User - ID: you can
enter it or simly write
"anonymous".
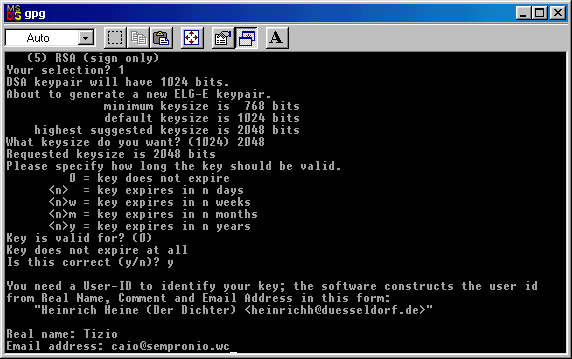
It's up to you: in the window below I wrote "Tizio".
It's up to you: in the window below I wrote "Tizio".
Now you must enter an email address, in
order to have it associated to your key. ( the email address below is
invalid, is just an
example )
example )
If you want you can now enter a comment,
a sign that will appear at the end of every message you sign/encrypt.
If you don't
want to do so, simlpy hit Enter.
This one below is just an example of a comment : "Try GPGshell - www.jumaros.de" , in italian.
want to do so, simlpy hit Enter.
This one below is just an example of a comment : "Try GPGshell - www.jumaros.de" , in italian.
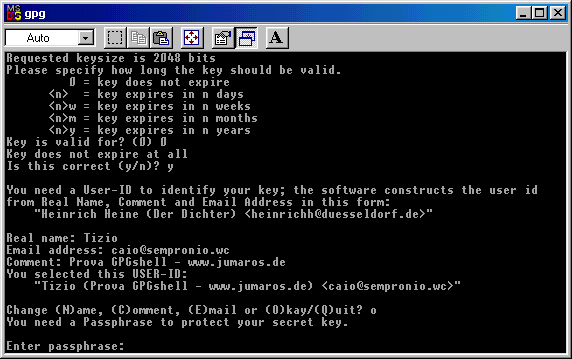
Now you have your last chanche to modify the data you entered ( just in case you made some mistakes or you changed your
mind ) without resetting the key's creation and start again from zero.
If everything is right, click on the O ( O like Ontario ) key to go to next step, in which you'll be asked to choose a password to
protect your key fron anauthorized use.
Here below you can see the password field: I'd like to say that a good password is made at least of 8 charachters as letters,
numbers and special characters.
I suggest to create an exclusive password, different from the ones you use for email or istant messaging.
I must say that a message encrypted with a passphrase like "Momma" is secure just like one created with something like
"d4h§3782\Y0344X@àò^".
The only difference is that with the last passphrase takes much more time and efforts for the malicious users which try to crack
it.
If someone gets your key because he has physical access to your pc ( or gets it from Internet using a trojan or a software
vulnerability ), the choice of the passphrase can make the big difference.
You should choose a good trade off between security and easyness of use, without reaching exaggerations that bring you to
write an entire book as passphrase when you encrypt or sign a message or a file, or, and that's even worst, writing it on a note
and leave it near your pc.
.
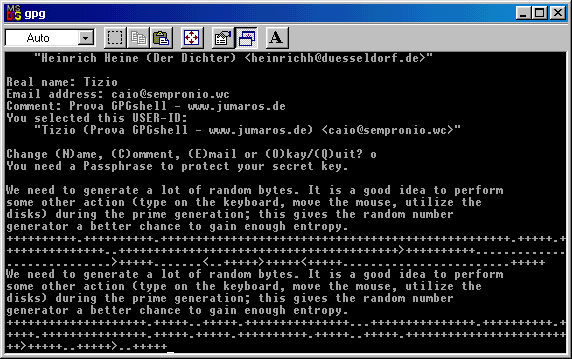
You must write it again (repeat
passhrase), then it will start the key generation, as you can see below:
The program suggest to type on the keyboard, move the mouse and perform actions like these ( opening folders or files )
during the key's generation process, in order to have a good entropy ( a random data generation ).
At the end of this step you'll be prompted and you can close the DOS window .
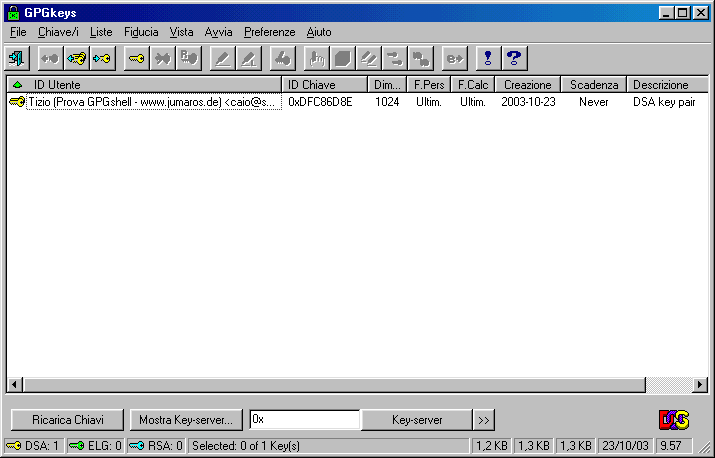
Now you can reach again the keyring (GPGkeys) and find your newly created : the yellow identifies it as a DSA key.
If you select the key you can ( mouse's right click) have access to different options.
Creating a GPG-SFX file with GPGshell
GPGshell includes the interesting possibility to create self extracting cryptated files (something like SDA on PGP ).
This can be very useful if you must send cryptated messages and/or files to a user that doesn't have a cryptographic program
which is compatible with PGP/GnuPG or that can't use it.
We are talking about a self extracting SFX file, which requires a password to be open. Clearly, the password won't be sent
with the file, but you can communicate it to the user by phone or you two should have agree on it before.
In order to use this option, in the previous version you should have downloaded some files and extract them in specific folders,
but since 3.00 version everything's included in the installation, so you don't have to download anything else.
If you ( or the addressee ) aren't a cryptography's expert and you need to send confidential data by email ( like banking or
medical ), this SFX options can be definitely useful.
I'd like to remember that in Italy, for istance, there are laws about privacy that stat clearly that Medical Centres must "adopt
crypting tools" in order to protect confidential data.
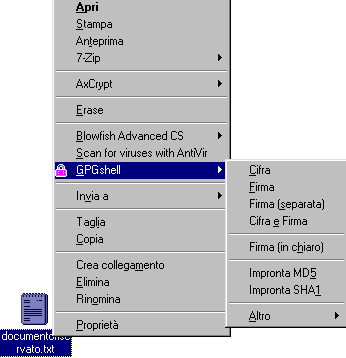
A practical example of GPGshell use
Now we can see a pratcical test on
creating a SFX file: let's suppose to have a "documento
bancario.doc" ( bank
document.doc, n.d.t.) and suppose that we want to encrypt it with GPGshell SFX, in order to send it to another bank.

document.doc, n.d.t.) and suppose that we want to encrypt it with GPGshell SFX, in order to send it to another bank.
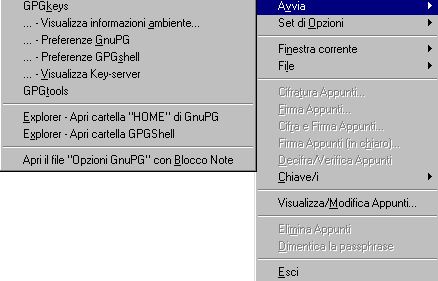
Select the file and with the mouse right
menu select this option:
GPGshell - Other - Create a symmetric encrypted file and create an SFX
You'll be asked to write a passphrase: for this simple test we'll choose 123.

Opening SFX file
GPGshell - Other - Create a symmetric encrypted file and create an SFX
You'll be asked to write a passphrase: for this simple test we'll choose 123.
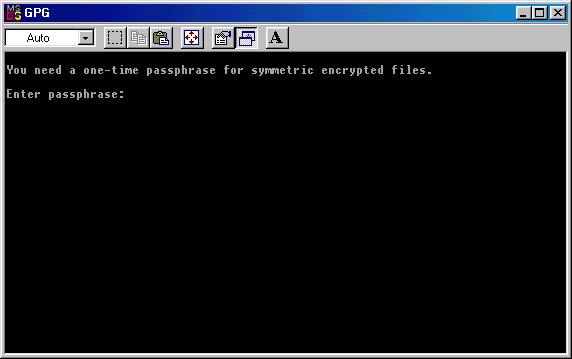
You must enter passphrase again, be
careful of what you write, because you won't see it.
Once entered passphrase again, click on
enter to proceed. You'll see the window shown below and you must hit
any key to
jump to next step.

jump to next step.
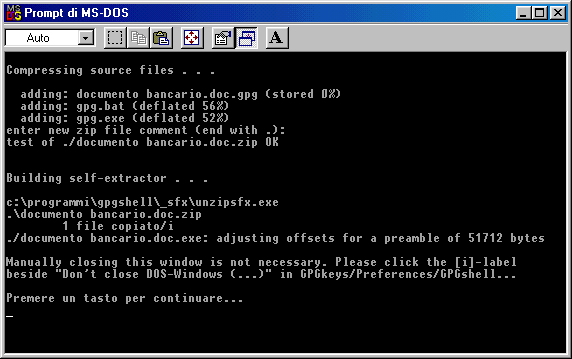
In the window shown below you can read
what's happening: the bank document is being encrypted and compressed
and you'll find also a gpg.exe ( compressed ) copy and gpg.bat.
You get it: in the executable SFX file there is also a GnuPG compressed copy. This is necessary because this allows the
adressee to decrypt the message.
Therefore, SFX dimensions are: GnuPG compressed executable (600 Kb in its origin, 300 Kb after compression ) plus the
document's dimension ( either compressed )
Hit any key and the DOS window will
close. You'll see the results and they are:
The document's original version:
The document's encrypted version (documento bancario.doc.exe ):
The SHA sign, inherent to SFX document's file (documento bancario.doc.sha )

The document's original version:
The document's encrypted version (documento bancario.doc.exe ):
The SHA sign, inherent to SFX document's file (documento bancario.doc.sha )
If you need to know some information
about dimensions, I can tell you that I get a 342 Kb doc.exe starting
from a 5
KbWordpad file, while the .sha file is just 176 Bytes. As you see we have file sizes that are easy to send by email, even in case
of bigger documents.
The .sha file contains the encrypted file's sign and this is the only way in which the file can be decrypted, but we'll talk about it
later.
KbWordpad file, while the .sha file is just 176 Bytes. As you see we have file sizes that are easy to send by email, even in case
of bigger documents.
The .sha file contains the encrypted file's sign and this is the only way in which the file can be decrypted, but we'll talk about it
later.
It's not necessary to send this file to
the addressee, it contains only a hash. you must take not of it and
communicate it to the
addressee ( of course not by email ).
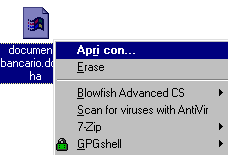
Opening the .sha file is easy, you must just select it and choose Open with in the mouse menu.
addressee ( of course not by email ).
Opening the .sha file is easy, you must just select it and choose Open with in the mouse menu.
In the next window choose the
application you'll use to open the file: any text editor will do, like
Notepad, Wordpad o Word.
The image below is taken from the italian version of Edit Pad Lite.
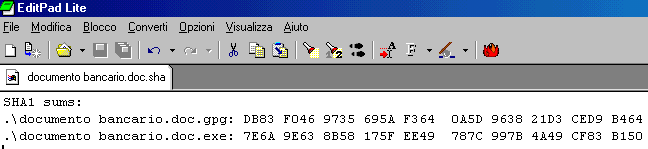
The image below is taken from the italian version of Edit Pad Lite.
Opening SFX file
From now on we'll see some picture about
the encrypted SFX file's opening.
The addressee, once received the file by email, must simply save the attachment on the hard disk and then double click on it.
He'll be required to enter a password and the next step will be the SFX's self extracting, showing its content.
The addressee, once received the file by email, must simply save the attachment on the hard disk and then double click on it.
He'll be required to enter a password and the next step will be the SFX's self extracting, showing its content.
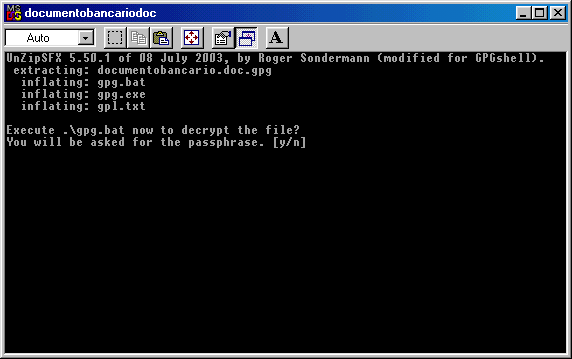
Clicking on SFX file you'll see the
window shown below: to proceed you must choose Y and then Enter.
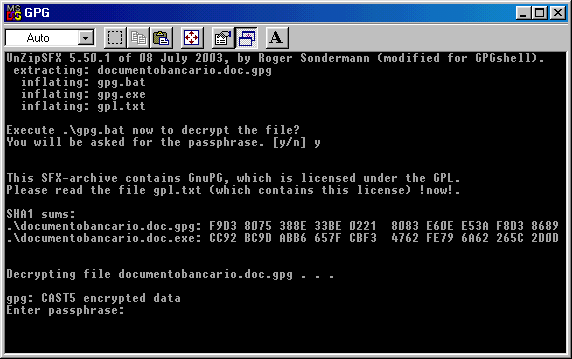
Enter the password and then hit Enter again.
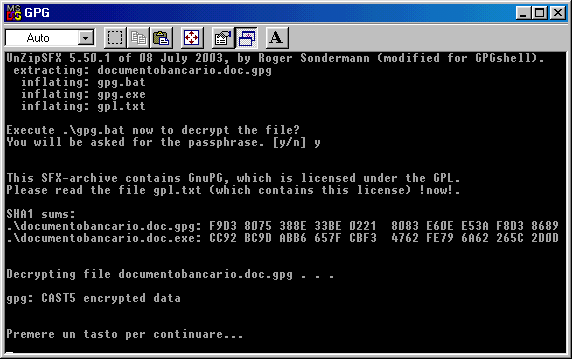
The document which is "inside" the SFX file will be extracted and you can hit any key to close the DOS window.
Here you have the original document,
ready to be handled by the addressee..
Is
SDA secure?
If the password you choose is "good" there is an optimal security
level, so, as I told before, try to avoid trivial passwords or to
choose too short passwords.
Remember also that to encrypt an SDA you must never use as password the same passphrase you used with GnuPG. If you're
used to handle SDA files to transfer confidential documents ( particularly financial ones ), you'd better use a new password
everytime you send a file; be sure you communicate it to the addressee, however.
Remember that every email message, while travelling from sender to addressee, pass through a large number of servers: there is
always the chanche that who has access to these servers to see these messages and their attachments and, of course, to copy
them and try to decrypt them.
.sha
file's importance
.sha file's role is to allow the SFX
file's checking: we can be sure that the file received is the same file
that has been sent.
Let's see a practical example: it can be helpful for those who need to send/receive an SDA file.
The Bank A must send a confidential financial documento to Bank B. Bank A trasforms it in an SDA file and takes note of the
password: then the Bank A operator opens the .sha file and takes carefully note of the two digests ( the most important is the
.exe file ). Then the Bank A operator sends the file by email to the Bank B operator.
The Bank B operator, once received the file, saves it on desktop ( without opening it ), then makes a phone call to the Bank A
and takes note of the whole file's digest ( called also sum or checksum ), then he proceed to the checking of this digest.
If the whole digest obtained by the phone call comunications is perfectly similar to the one contained in the received file, the
Bank B operator will launch the SDA file, entering the password and decrypting it.
Why making ourselves sure that the file is the same?
There are a lot of reasons for making it: there is the possibility to change the SDA file in attachment with another, there is the
chanche that the file can be maliciously or accidentally infectyed ( there are a lot of virus that infect .exe files ); there is also the
possibility that someone is trying to get the password: a malicious user can "catch" the SDA file and attach a backdoor to it,
which can steal the password or gain control of the addressee pc.
This last possibility is much more likely to happen than the chance to violate an encrypted file.
If all I'm saying appears paranoid to the common internet user, remember that there are people that work and gain a lot with the
computer, like the banks, or people that do very confidential studies or researches. For them security is crucial ($$$).
The crytical aspects in the whole operation are two: one is verifying that the file received is the same that has been sent, the
other is the password communication between the two users*.
* ( sending the password by email with the file attached is simply absurd; it's absurd either if you send it in another email, if you
don't encrypt the message )
Password exchange between users can be done by phone or, in a much more secure way, you can prepare two identical lists
of passwords, written on a paper sheet. The two users can have both the list and they can communicate by phone, telling just
what number of the list is the password chosen for that particular SDA file. It's much more easy to corrupt a phone operator
than to decrypt a file coded with a good password.
How
can you verify the digest?
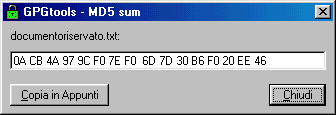
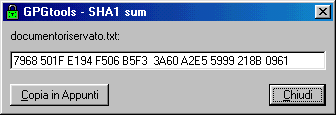
GPGshell
allows you to easily verify the file's digest (SHA1 or MD5) , you just
have to select it and in the mouse menu choose
"Impronta MD5" oppure "Impronta SHA1": these are two options and are equally trustworth..
When you take note of the digest/checksum , remember always to take also note if it is MD5 or SHA1, because they are
different.
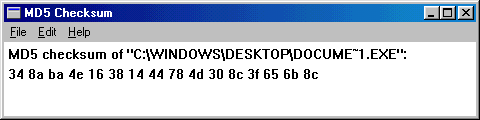
Just in case the other user doesn't have GPGshell (or others) or he can't use a cryptographic program, you can use some other
program built for this aim.
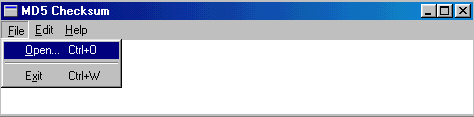
There are a lot of free programs, you can use f.i. MD5 Checksum 1.04 (free and Open Source but it works only for MD5).
It's a .zip file: once extracted you'll have a folder that contains md5cksum.exe file. In order to verify a digest in MD5 , you just
have to double click on it and then drag & drop it.
Other programs built to verify digest are ( Open Source ) OpenSSL32 - mdigest - md5summer - wxChecksums
Jacksum ( Java, 21 kind of digests) or the little (50Kb) but very good Damn Hasc Calculator ( not Open Source )
Now let's see how to encrypt, decrypt and sign files using GPGshell; we can do it in two ways, you can choose the one you
prefer.
One is the "vertical" menu we talked about before; you right click with the mouse on the green padlock on the tray and you can
choose from different options
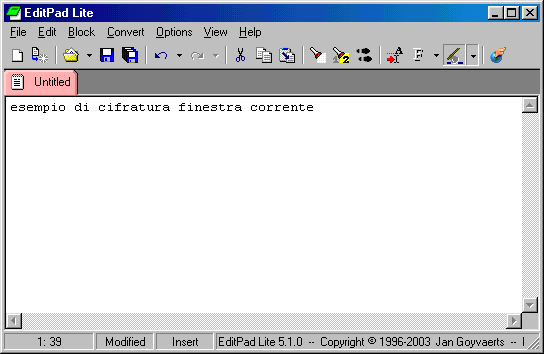
Active window:
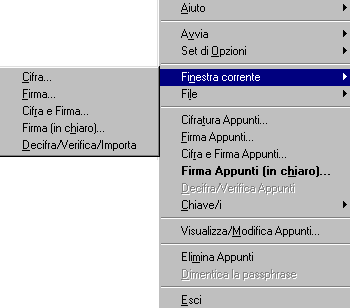
If you have an open document, you can encrypt it ( in this example I'm using Editpad ):
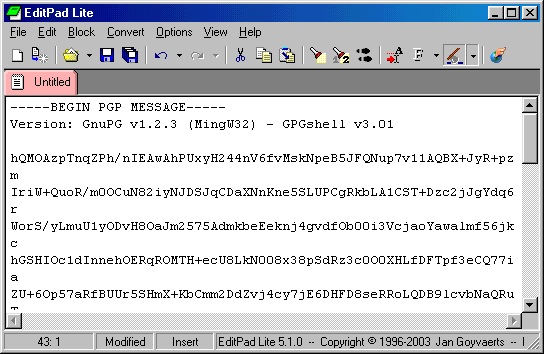
Here below you see the encrypted page
File:
If you choose File, you'll see a window and you must enter the file path.
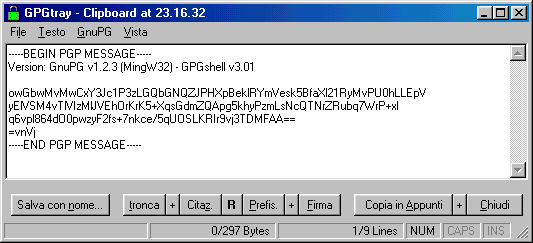
Encrypting clipboard notes
Choosing this option you can encrypt text on clipboard ( memory ), so you can paste in on a different window.
Here it can be helpful the GPGtray clipboard ( I prefer Editpad Lite since is multi-window ).

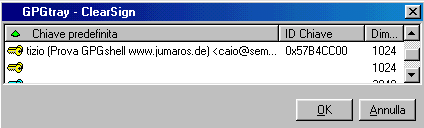
Signig clipboard notes
You can either sign clipboard notes.
Be careful, this kind of sign can seem inusual. Here below you can see an example.
Encrypting and Signign clipboard
You can encrypt and sign them at the same time.
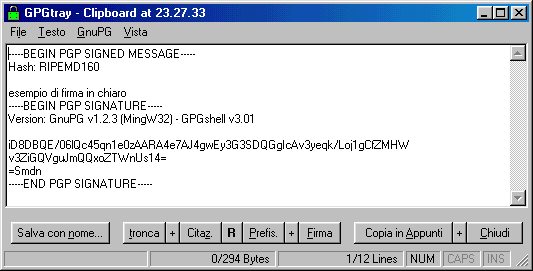
Signign clipboardFirma Appunti (in chiaro)
Si tratta della firma classica che la maggior parte di voi conosce, dopo la richiesta di inserimento della pasword il contenuto
degli appunti in memoria viene firmato, a voi poi incollarlo altrove per visualizzarlo.
Decrypting/verifying clipboard notes
( only if there's something in memory )
For decrypting text and eventually verify sign.
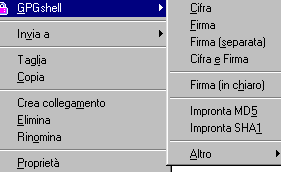
The alternative way to do everything I said above is through mouse menu
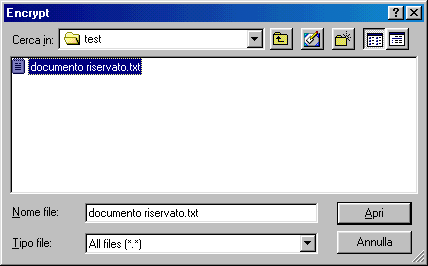
We see as in the images below the documentoriservato.txt ( confidentialdoc.txt, n.d.t.) file will become a txt.gpg file.
Even the traditonal text file icon is modified:


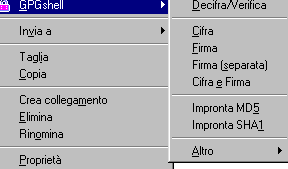
It's possible to encrypt and sign a file at the same time: in this
case, when you're choosing Encrypt/Verify you'll see appearing
"Good signature from ..."
Note that the two screenshots are different just for the "Encrypt/Verify" on the right one. This options appears on the menu only
after selecting a encrypted/signed file.

"Impronta MD5" oppure "Impronta SHA1": these are two options and are equally trustworth..
When you take note of the digest/checksum , remember always to take also note if it is MD5 or SHA1, because they are
different.
Just in case the other user doesn't have GPGshell (or others) or he can't use a cryptographic program, you can use some other
program built for this aim.
There are a lot of free programs, you can use f.i. MD5 Checksum 1.04 (free and Open Source but it works only for MD5).
It's a .zip file: once extracted you'll have a folder that contains md5cksum.exe file. In order to verify a digest in MD5 , you just
have to double click on it and then drag & drop it.
If you can't drag & drop it you can
choose Menu - File - Open and then enter the file's path.
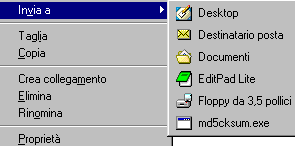
You can also select MD5Checksum and in
the mouse menu choose "create link" and copy this link in the Send To
Window's
folder, as you see below.
In this way you can easily select a file and send it to the program.
folder, as you see below.
In this way you can easily select a file and send it to the program.
Other programs built to verify digest are ( Open Source ) OpenSSL32 - mdigest - md5summer - wxChecksums
Jacksum ( Java, 21 kind of digests) or the little (50Kb) but very good Damn Hasc Calculator ( not Open Source )
Encrypting
and Signing files with GPGshell
Now let's see how to encrypt, decrypt and sign files using GPGshell; we can do it in two ways, you can choose the one you
prefer.
One is the "vertical" menu we talked about before; you right click with the mouse on the green padlock on the tray and you can
choose from different options
Active window:
If you have an open document, you can encrypt it ( in this example I'm using Editpad ):
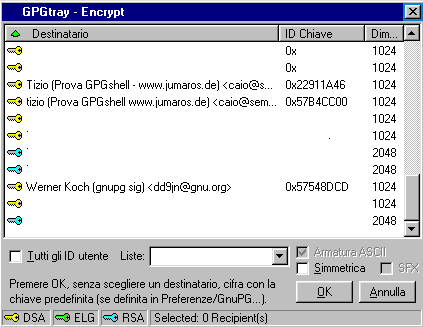
You'll see a window in which you'll be
asked which key do you want to use, if you want to encrypt it for all
the users belonging
to the keyring, o if choosing a simmetric encrypting.
to the keyring, o if choosing a simmetric encrypting.
Here below you see the encrypted page
File:
If you choose File, you'll see a window and you must enter the file path.
Encrypting clipboard notes
Choosing this option you can encrypt text on clipboard ( memory ), so you can paste in on a different window.
Here it can be helpful the GPGtray clipboard ( I prefer Editpad Lite since is multi-window ).
Signig clipboard notes
You can either sign clipboard notes.
Be careful, this kind of sign can seem inusual. Here below you can see an example.
Encrypting and Signign clipboard
You can encrypt and sign them at the same time.
Signign clipboardFirma Appunti (in chiaro)
Si tratta della firma classica che la maggior parte di voi conosce, dopo la richiesta di inserimento della pasword il contenuto
degli appunti in memoria viene firmato, a voi poi incollarlo altrove per visualizzarlo.
For decrypting text and eventually verify sign.
The alternative way to do everything I said above is through mouse menu
We see as in the images below the documentoriservato.txt ( confidentialdoc.txt, n.d.t.) file will become a txt.gpg file.
Even the traditonal text file icon is modified:
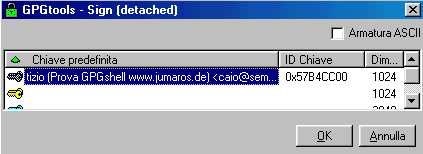
Another picture, but now is a detatched
signature. If I select the same document that I just encrypted I choose
from mouse
menu "Detatched Signature".
We'll be asked about the key we want to use, once selected it, we just hit "OK".
menu "Detatched Signature".
We'll be asked about the key we want to use, once selected it, we just hit "OK".
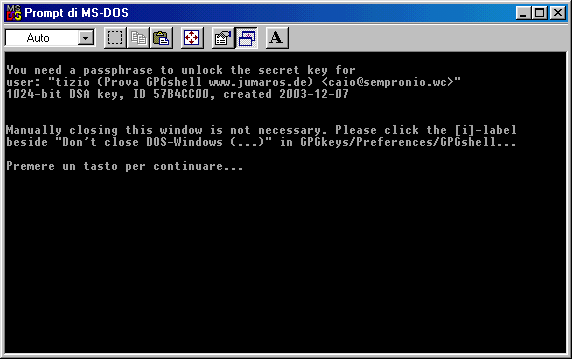
As usual, it will be required the
passphrase to unlock the secret key. This always happens when you sign
a file.
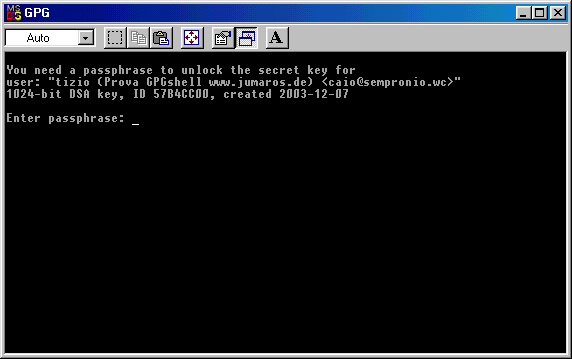
As you can see from the picture above,
the window will close if you hit any key. Handling the options makes
possible to close
automatically the DOS window without any action.
Here you have the detatched signature associated to documentoriservato.gpg ( note the .sig extension )
automatically the DOS window without any action.
Here you have the detatched signature associated to documentoriservato.gpg ( note the .sig extension )
"Good signature from ..."
Note that the two screenshots are different just for the "Encrypt/Verify" on the right one. This options appears on the menu only
after selecting a encrypted/signed file.
Where can you find
help on GPGshell
Please don't ask me help, I don't do Help Desk..:-) here you can
find help about GPG - alt.security.pgp
- PGP BasicsIf
you take a glance below you'll see there are GPGshell FAQs (online )
and online documentation about installation.
There are also GnuPG's FAQs, in english, of course.
There are also GnuPG's FAQs, in english, of course.